Here is the comprehensive, start-to-finish guide. This consolidates everything into a single, executed plan to get your automation running from scratch.
The Goal
Automate a security alert process that:
- Scans Microsoft Entra ID (Azure AD) sign-in logs every 48 hours.
- Filters for Error 50053 (Account Locked / Brute Force attempts).
- Sends an HTML email report with:
- A summary table (User, Total Events, Last Attempt).
- A detailed CSV attachment of all raw logs.
Phase 1: Environment Setup
1. Create an Automation Account
- Go to the Azure Portal and search for Automation Accounts.
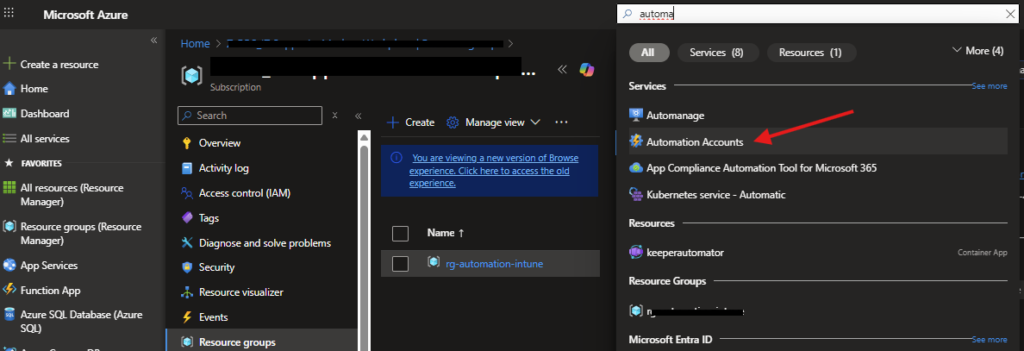
- Click + Create.
- Name:
Security-Automation-01(or similar). - Region: Choose your preferred region.
- Managed Identity: Ensure « System assigned » is selected (default).
- Click Review + Create.
2. Install Required Modules
Your script relies on specific Microsoft Graph modules that are not installed by default. You must install them in this exact order:
- Go to your Automation Account -> Modules (under Shared Resources).
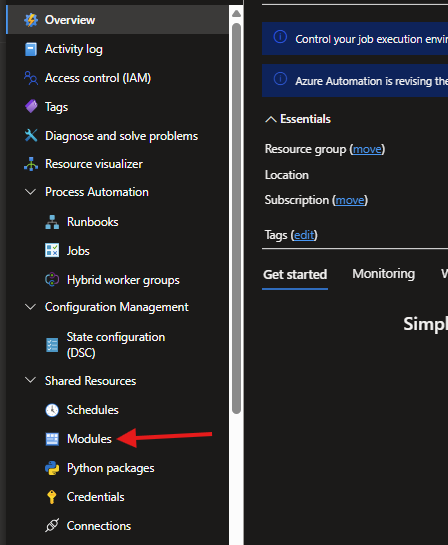
- Click + Add a module -> Browse from gallery.
- Module 1: Search for
Microsoft.Graph.Authentication.
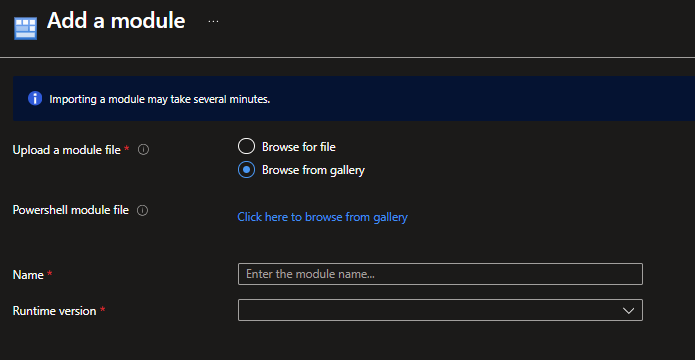
- Runtime version: Select 5.1.
- Click Import and WAIT (approx. 5 mins) until status is « Available ».
- Module 2: Search for
Microsoft.Graph.Reports.- Runtime version: Select 5.1.
- Click Import and WAIT.
- Module 3: Search for
Microsoft.Graph.Users.Actions.- Runtime version: Select 5.1.
- Click Import and WAIT.
3. Grant Permissions (The « Ghost Badge »)
The Automation Account needs permission to read logs and send emails. Run this PowerShell script locally on your computer (Run as Administrator) to assign these permissions:
# Run this LOCALLY on your PC to set up the permissions
# ---------------------------------------------------------
$AutoAccountName = "YourAutomationAccountName" # <--- UPDATE THIS
$ResourceGroup   = "YourResourceGroupName"     # <--- UPDATE THIS
# ---------------------------------------------------------

Connect-AzAccount
Connect-MgGraph -Scopes "AppRoleAssignment.ReadWrite.All", "Application.Read.All"

# 1. Get Automation Account Identity
$AutoAccount = Get-AzAutomationAccount -ResourceGroupName $ResourceGroup -Name $AutoAccountName
$ManagedIdentityObjectId = $AutoAccount.Identity.PrincipalId

# 2. Get Graph Service Principal
$GraphAppId = "00000003-0000-0000-c000-000000000000"
$GraphSP = Get-MgServicePrincipal -Filter "appId eq '$GraphAppId'"

# 3. Assign Permissions
$Permissions = @("AuditLog.Read.All", "Directory.Read.All", "Mail.Send")

foreach ($Perm in $Permissions) {
    $AppRole = $GraphSP.AppRoles | Where-Object { $_.Value -eq $Perm }
    New-MgServicePrincipalAppRoleAssignment -PrincipalId $ManagedIdentityObjectId `
        -ResourceId $GraphSP.Id -AppRoleId $AppRole.Id
    Write-Output "Assigned: $Perm"
}
Phase 2: The Runbook Script
- Go to Automation Account -> Runbooks.
- Click + Create a runbook.
- Name:
Monitor-BruteForce-50053. - Runbook type: PowerShell.
- Runtime version: 5.1.
- Paste the following code (make sure to update the email addresses at the top):
<#
    .DESCRIPTION
    Retrieves Azure AD Sign-in logs for Error Code 50053 (Account Locked)
    and sends an HTML email report with CSV attachment.
#>

# ---------------- CONFIGURATION ---------------- #
# UPDATE THESE VARIABLES
$SenderEmail    = "admin@yourdomain.com"      # Must be a real mailbox
$RecipientEmail = "security@yourdomain.com"   # Who gets the alert
$LookbackHours  = 48                          # Matches the schedule frequency
# ----------------------------------------------- #

try {
    # 1. Authenticate using Managed Identity
    Write-Output "Connecting to Microsoft Graph..."
    Connect-MgGraph -Identity

    # 2. Define Time Range
    $EndDate = Get-Date
    $StartDate = $EndDate.AddHours(-$LookbackHours)
    $StartDateIso = $StartDate.ToString("yyyy-MM-ddTHH:mm:ssZ")

    # 3. Query Sign-in Logs (Error 50053)
    Write-Output "Querying Sign-in logs for error 50053 since $StartDateIso..."

    $Filter = "createdDateTime ge $StartDateIso and status/errorCode eq 50053"
    $SignIns = Get-MgAuditLogSignIn -Filter $Filter -All -Property CreatedDateTime,UserPrincipalName,AppDisplayName,IpAddress,Status,Location

    if ($SignIns.Count -eq 0) {
        Write-Output "No brute force attempts found. Exiting."
        return
    }

    Write-Output "Found $($SignIns.Count) events."

    # ---------------------------------------------------------
    # PART A: Create "User Summary" (Recap)
    # Groups by user to show unique impacted accounts
    # ---------------------------------------------------------
    $RecapData = $SignIns | Group-Object UserPrincipalName | ForEach-Object {
        $LatestEvent = $_.Group | Sort-Object CreatedDateTime -Descending | Select-Object -First 1
        [PSCustomObject]@{
            User           = $_.Name
            'Last Attempt' = $LatestEvent.CreatedDateTime
            'Total Events' = $_.Count
            'Last IP'      = $LatestEvent.IpAddress
        }
    }

    # ---------------------------------------------------------
    # PART B: Create "Detailed Logs" (For CSV & Lower Table)
    # ---------------------------------------------------------
    $ReportData = New-Object System.Collections.Generic.List[PSObject]
    foreach ($log in $SignIns) {
        $row = [PSCustomObject]@{
            TimeUTC  = $log.CreatedDateTime
            User     = $log.UserPrincipalName
            IP       = $log.IpAddress
            Location = "$($log.Location.City), $($log.Location.CountryOrRegion)"
            App      = $log.AppDisplayName
        }
        $ReportData.Add($row)
    }

    # 4. Generate CSV Attachment
    $CsvFilePath = "$($env:TEMP)BruteForceReport.csv"
    $ReportData | Export-Csv -Path $CsvFilePath -NoTypeInformation
    $CsvBytes = [System.IO.File]::ReadAllBytes($CsvFilePath)
    $CsvBase64 = [Convert]::ToBase64String($CsvBytes)

    # 5. Generate HTML Tables
    $HtmlTableRecap  = $RecapData  | ConvertTo-Html -Fragment
    $HtmlTableDetail = $ReportData | ConvertTo-Html -Fragment

    # 6. Build Email Body
    $EmailBody = @"
    <html>
    <head>
        <style>
            body { font-family: 'Segoe UI', Arial, sans-serif; font-size: 14px; }
            h2 { color: #d9534f; }
            h3 { color: #333; margin-top: 20px; border-bottom: 2px solid #ddd; padding-bottom: 5px; }
            table { border-collapse: collapse; width: 100%; margin-bottom: 20px; }
            th { background-color: #f2f2f2; border: 1px solid #ddd; padding: 8px; text-align: left; }
            td { border: 1px solid #ddd; padding: 8px; }
            tr:nth-child(even) { background-color: #f9f9f9; }
        </style>
    </head>
    <body>
        <h2>⚠️ Security Alert: Account Lockouts Detected</h2>
        <p>We detected <strong>$($SignIns.Count)</strong> failed sign-in attempts (Error 50053) in the last $LookbackHours hours.</p>

        <h3>👤 User Summary (Recap)</h3>
        <p>The following users are impacted:</p>
        <table>
            $HtmlTableRecap
        </table>

        <h3>📝 Detailed Event Log</h3>
        <table>
            $HtmlTableDetail
        </table>

        <p><em>Please see the attached CSV for raw data.</em></p>
    </body>
    </html>
"@

    # 7. Send Email
    $Message = @{
        Subject = "Security Alert: Brute Force Recap ($($RecapData.Count) Users Impacted)"
        Body = @{ ContentType = "HTML"; Content = $EmailBody }
        ToRecipients = @( @{ EmailAddress = @{ Address = $RecipientEmail } } )
        Attachments = @( @{
            "@odata.type" = "#microsoft.graph.fileAttachment"
            Name = "SignIn_50053_Report.csv"
            ContentType = "text/csv"
            ContentBytes = $CsvBase64
        })
    }

    Write-Output "Sending email..."
    # Note: SaveToSentItems:$false prevents the 'False' parameter error
    Send-MgUserMail -UserId $SenderEmail -Message $Message -SaveToSentItems:$false
    Write-Output "Process Completed Successfully."

} catch {
    Write-Error "An error occurred: $_"
}
- Save and test and then Publish the Runbook.
Phase 3: Scheduling
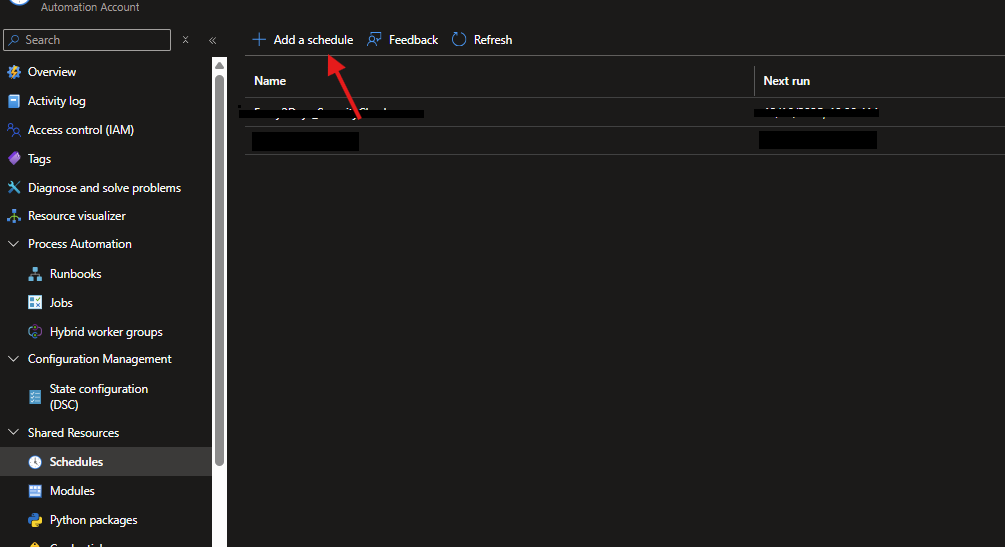
- In your Automation Account, go to Schedules -> + Add a schedule.
- Name:
Every_2_Days. - Recurrence: Recurring -> Recur every 2 Days.
- Create.
- Go back to your Runbook -> Link to schedule.
- Select the schedule you just created.
Troubleshooting Checklist
- Error:
Get-MgAuditLogSignIn not recognized- Fix: You missed installing the
Microsoft.Graph.Reportsmodule.
- Fix: You missed installing the
- Error:
Send-MgUserMail not recognized- Fix: You missed installing the
Microsoft.Graph.Users.Actionsmodule.
- Fix: You missed installing the
- Error:
Positional parameter... 'False'- Fix: Ensure the script says
-SaveToSentItems:$false(with the colon).
- Fix: Ensure the script says
- No Email Received?
- Fix: Check if the
$SenderEmailis a valid mailbox and that your Managed Identity has theMail.Sendpermission assigned.
- Fix: Check if the
You now have a fully automated « set it and forget it » security monitor!